the brightness level of a photograph is referred to as the what ?
Every advanced and professional photographer today absolutely needs to larn how to useexposure in photography. When you lot starting time starting time taking pictures, yous might be confused by the countless buttons and menu options on your camera. However, there is no excuse for using a bad in-camera exposure. By understanding how to betrayal an epitome properly, you will be able to capture photographs of the ideal brightness, including high levels of item in both the shadows and highlight areas. This article explains exposure in item, as well every bit helping you understand the 3 most of import camera settings of all: shutter speed, aperture, and ISO.

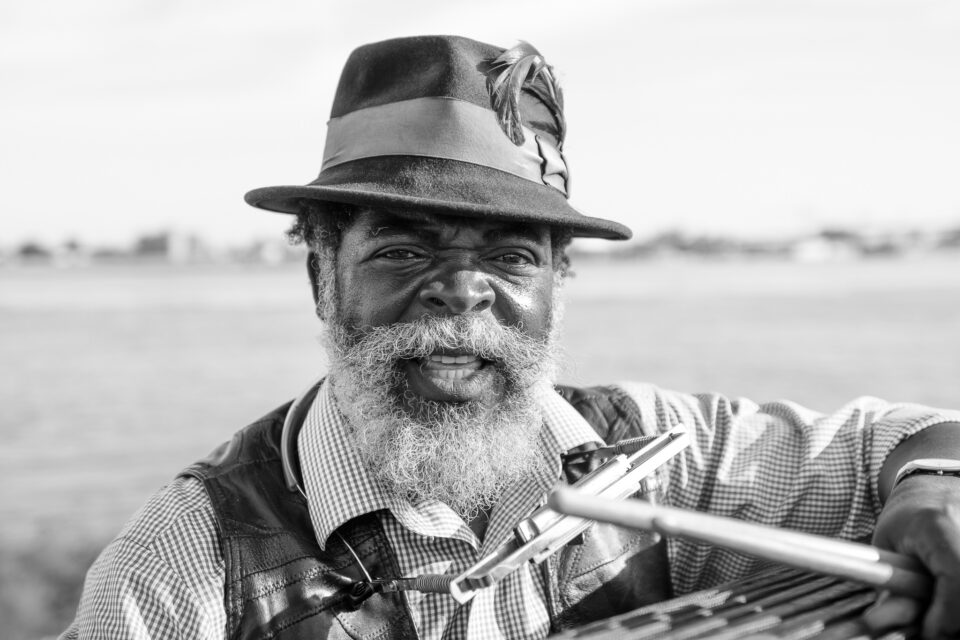
1/800 second, f/ii.8, ISO 800.
Table of Contents
What Is Exposure in Cameras?
In photography, exposure is the amount of low-cal which reaches your photographic camera sensor or movie. It is a crucial part of how brilliant or dark your pictures announced.
There are merely two camera settings that touch on the bodily "luminous exposure" of an image: shutter speed and aperture. The third setting, camera ISO, likewise affects the effulgence of your photos, and it is every bit of import to empathise. Too, yous can brighten or darken a photo by editing it in post-processing software like Photoshop on your computer.
It sounds basic, but exposure is a topic which confuses fifty-fifty advanced photographers. The reason is simple: For every scene, a broad range of shutter speed, aperture, and ISO settings will upshot in a photograph of the proper effulgence. You lot oasis't "mastered exposure" once yous can accept a photo that's the correct brightness. Even your camera'south Auto mode will do that near of the time. Instead, getting the proper exposure for a photo is about balancing those three settings then the residue of the photograph looks good, from depth of field to sharpness.
If you really want to master exposure, reading about it isn't enough. You also need to go out into the field and practice what you've learned. In that location's no quick-and-muddy way to pick up a skill like this. Simply if you can lay a solid groundwork, y'all'll be at a huge advantage when y'all get out and do it for yourself. The goal of this comprehensive article is to teach youall the basics that you need to know about exposure.
Shutter speed
We'll outset with a good one. Shutter speed isn't particularly difficult; it is just the amount of time your camera spends taking a motion picture. This could be one/100 of a second, or 1/ten of a 2d, or three seconds, or five minutes. Some people build custom cameras that accept decades to capture a single photo.
Your camera won't allow yous accept a decades-long photograph. Instead, the longest commanded shutter speed tends to exist around 30 seconds, although information technology does depend upon your photographic camera. For instance, on the Nikon D850, you lot can shoot any shutter speed from 1/8000 2nd to xxx seconds, as well equally a fourth dimension mode for even longer exposures. Other cameras generally allow similar settings.
So, why does shutter speed really matter? There are ii master reasons:
First, as you would await, a long shutter speed (several seconds) lets in a large amount of low-cal. If y'all take a normal daytime photo with a 30-2nd shutter speed, y'all volition capture an image that is completely white. The opposite is true, too; a quick shutter speed merely lets in a small amount of light. If you take a photo at nighttime with a ane/8000-second shutter speed, the photo volition exist completely black.
Take a look at the series of examples below. Here, 1/25 second was also dark ("underexposed"), and 1/3 2nd was likewise bright ("overexposed"). This should give you an idea of the effulgence differences with shutter speed:

Second, the but other large upshot is the motility blur in your images. Not surprisingly, a long shutter speed (such as v seconds) captures anything that moves during the exposure. If a person walks past, they might appear as a characterless streak beyond the prototype, since they aren't in one place long enough for the long exposure to capture them sharply. That's chosen motion blur.
Past comparison, a quick shutter speed (such as i/1000 second) does a much better chore freezing motion in your photo — fifty-fifty something moving quickly. You tin can photograph a waterfall at i/1000 second and see individual droplets frozen in midair. Without a camera, they might take been invisible.
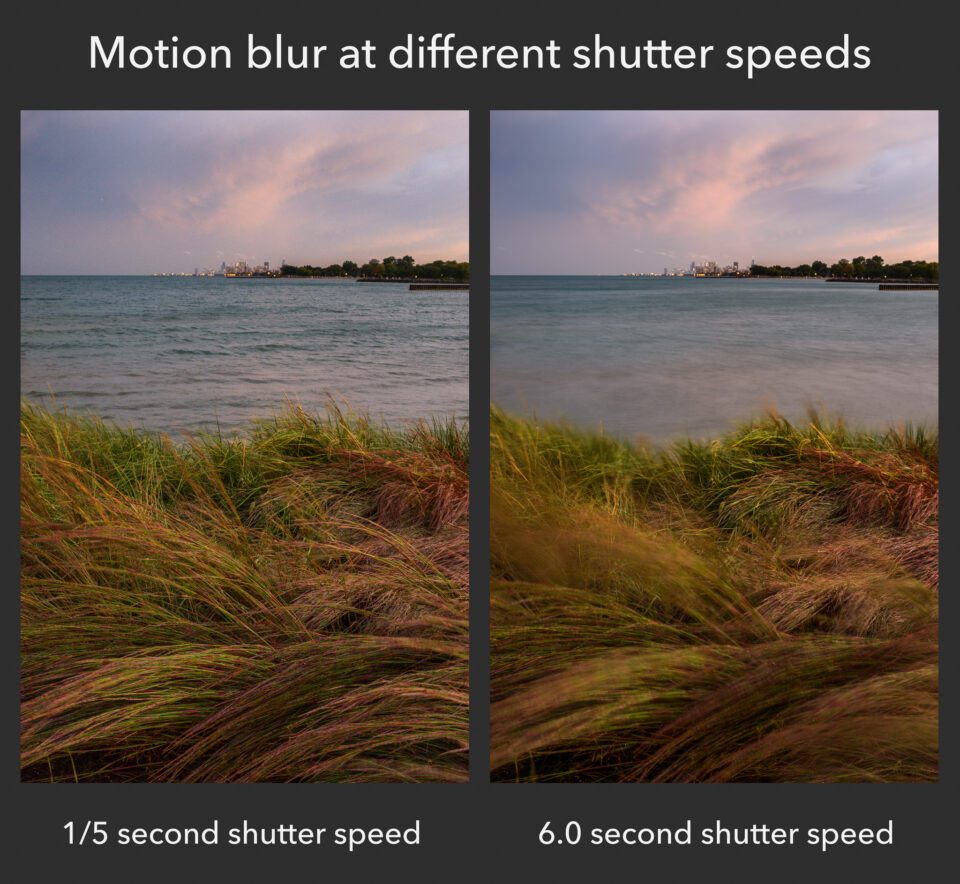
Accept a look at the images below. Here, I was taking pictures on a windy day. The foreground grass and the waves backside them were all moving quickly. As yous tin can encounter, depending upon my shutter speed, at that place was a major difference in motion mistiness:
At that place are ii types of motion blur that you may encounter due to your shutter speed: photographic camera blur and subject field blur.
If you lot're doing handheld photography, camera blur could be very significant. It's impossible to hold your camera perfectly still while y'all're taking a picture, and even slight shake can pb to very blurry photos. That's one reason why many photographers end upwardly using tripods! (There are other benefits of tripods, as well.)
However, although a tripod protects confronting camera movement, it does nix to forestall scene movement. For example, if you lot're taking landscape photos on a windy day – even with a tripod – you lot might stop up with areas of blurriness, as in the prototype above. This is chosen subject blur.
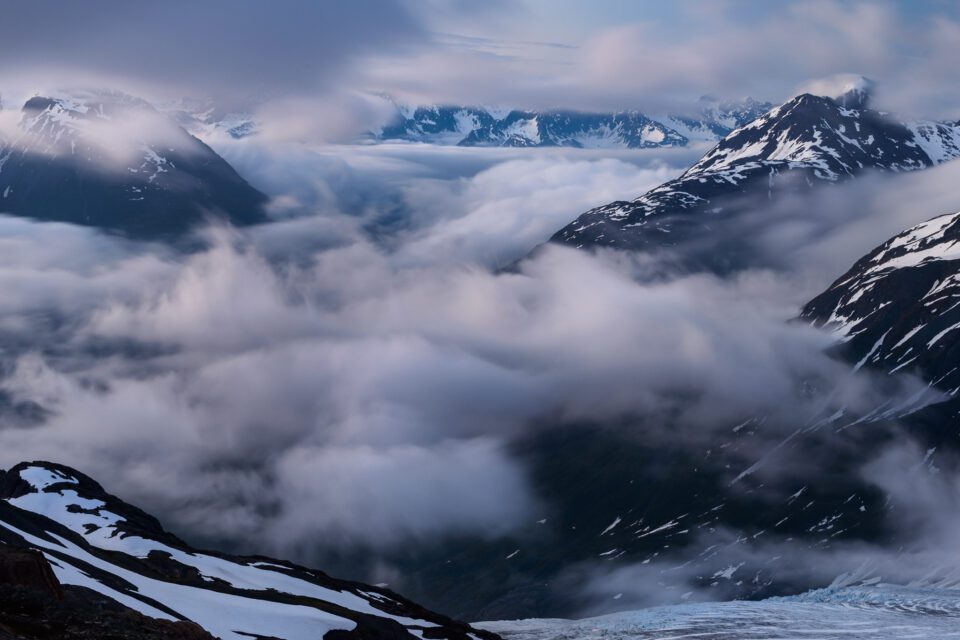
Sometimes, you can apply photographic camera or bailiwick blur artistically, and it looks practiced. For case, if y'all're photographing clouds as they laissez passer through a valley, a long shutter speed might be a nice touch:
However, in many cases, you probably will want to eliminate motion mistiness so that your entire photo is sharp. If that'south your goal, you need to pick a shutter speed that is quick enough to freeze whatever motility. Then, what shutter speed should you lot apply? Is there a practiced range that tends to provide sharp photos of moving discipline?
Not really, because it all depends upon some exterior factors – nigh importantly, the amount of motion in your scene. If your subject is moving very quickly, you'll need a fast shutter speed. If your subject is continuing nevertheless, or only moving very slowly, you can get away with a longer shutter speed.
Also, the farther you zoom in (i.e., the longer your "focal length"), the more than you'll magnify motion blur. So, you'll find that you generally need quicker shutter speeds to freeze motion properly when you lot're using something like a telephoto lens.
The all-time road to larn all of this is but to keep practicing. Over time, you lot'll build a good mental moving-picture show of the shutter speeds you tin can use in a item environs without risking move mistiness. Whether that's ane/250 second, 1/10 second, or 20 seconds, it'll exist second nature. Also, later you've taken a picture show in the field, review it and run into if at that place is any blur when y'all zoom in. If so, y'all'll demand a quicker shutter speed.
Want a quick-and-muddied guideline? Use i/500 2nd or faster for sports and wildlife action. Use 1/100 second or faster for telephoto portrait images. Use ane/50 2nd or faster for wider-angle portrait or travel photos where your bailiwick isn't moving too much. If your subject is completely still, and you have a tripod, use any shutter speed you lot want.
These are very general suggestions, but they are a good place to start. However, your goal should be to outgrow these tips and develop your own mental model instead. Shutter speed is i of the near intuitive aspects of exposure, and a bit of practice volition be plenty to assistance your photographs improve significantly.
Aperture
Aperture is very similar to the "educatee" of your camera lens. Just similar the pupil in your eye, it can open up or shrink to change the amount of calorie-free that passes through. This is how the aperture blades look on a typical lens:
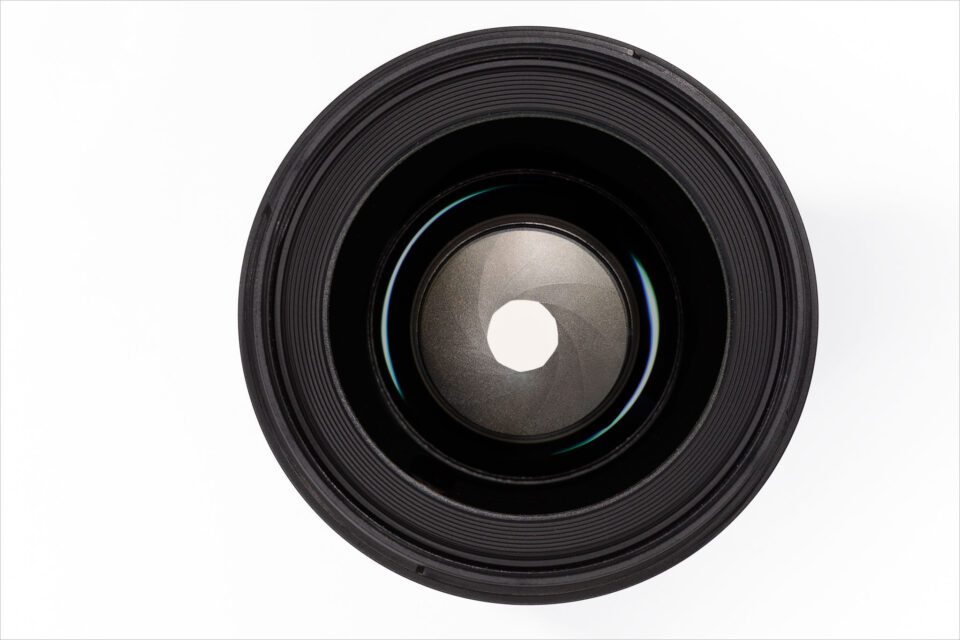
Your lens probably looks something like this. The shape in the middle is called thediscontinuity. It is made up of several blades – nine of them in this instance, but your lens may differ.
Discontinuity blades work a lot similar the pupil in your eyes. At night, your pupils dilate and so you tin can see things more than easily. The same is true for aperture. When it is dark, you tin can open the aperture blades in your lens and allow in more light. Aperture is written as f/Number. For example, you tin can have an aperture of f/two, or f/8, or f/16, and so on.
It is very important to remember that discontinuity is a fraction. This is the biggest mistake beginners make when they talk about aperture. If you go this wrong, information technology will be difficult to remember how aperture works or use information technology yourself to capture the correct exposure in the field.
Agreement aperture:
Which aperture is larger – f/2 or f/16?
Because discontinuity is a fraction, all y'all need to do is call up some uncomplicated math. i/2 is bigger than 1/16, which means that f/2 is the larger aperture.
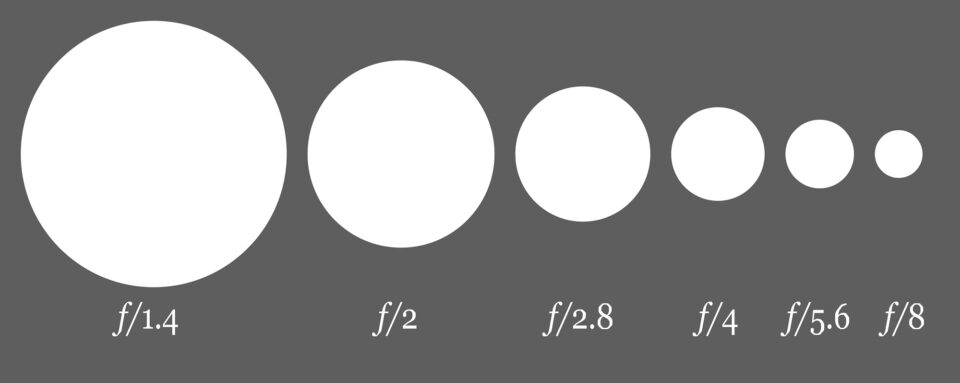
Typically, the largest aperture you lot can set will be something like f/one.four, f/1.8, f/2, f/2.viii, f/three.v, f/4, or f/five.half dozen. Information technology changes from lens to lens. The smallest discontinuity on most lenses is something similar f/16, f/22, or f/32. This diagram demonstrates the relative sizes of diverse aperture settings:
Then, which aperture setting is best for photography and capturing the proper in-camera exposure? It depends upon the photo. Aperture influences many parts of an paradigm, just it has 2 furnishings that are more important than anything else: exposure and depth of field.
Discontinuity and Exposure
The larger your discontinuity, the brighter your photograph – the more than light you capture. Again, your pupils piece of work just like this, too; they open or shut to let in different amounts of lite. So, when you are trying to expose a photo properly, it is crucial to pay attention to your discontinuity setting.
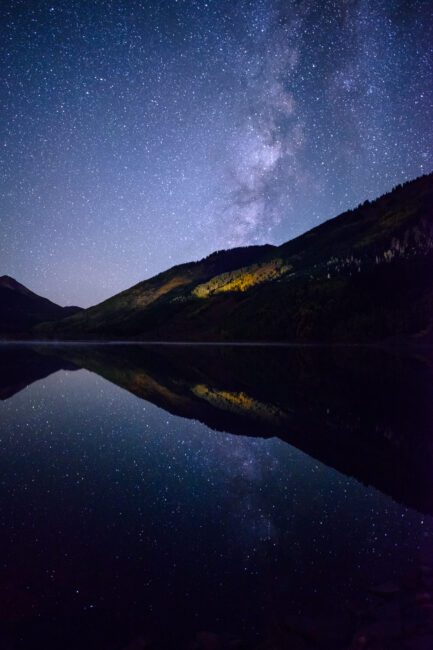
A large aperture lets in more light. Apertures like f/1.iv and f/2 practically let you see in the night. On the flip side, a small aperture similar f/16 (with about airtight discontinuity blades) lets in far less low-cal. If you try to photograph Milky Way at f/xvi, your final image volition be essentially black.
By changing your aperture and shutter speed settings, you lot tin capture exactly the amount of light you want – resulting in a photo with the proper exposure. That is what makes aperture so powerful.
Discontinuity and Depth of Field
The other important effect of aperture is on depth of field.
Depth of field is the corporeality of your scene, from front to back, that appears abrupt. In a mural photo, your depth of field might be huge, stretching from the foreground to the horizon. In a portrait photo, your depth of field might be then thin that only your subject's eyes are precipitous.
Discontinuity changes your depth of field, which makes a big difference if you desire to capture the best possible photographs. Changing the depth of field in an prototype will alter the way it looks completely.
To be specific, small apertures (like f/11 or f/16) requite you a large depth of field. If you want everything from forepart to back to appear sharp, those are good settings to use. Big apertures (like f/1.iv or f/ii.8) capture a much thinner depth of field, with a shallow focus outcome. They are platonic if y'all are trying to isolate only a modest office of your bailiwick, making everything else blurred.
Here is a sample comparison:
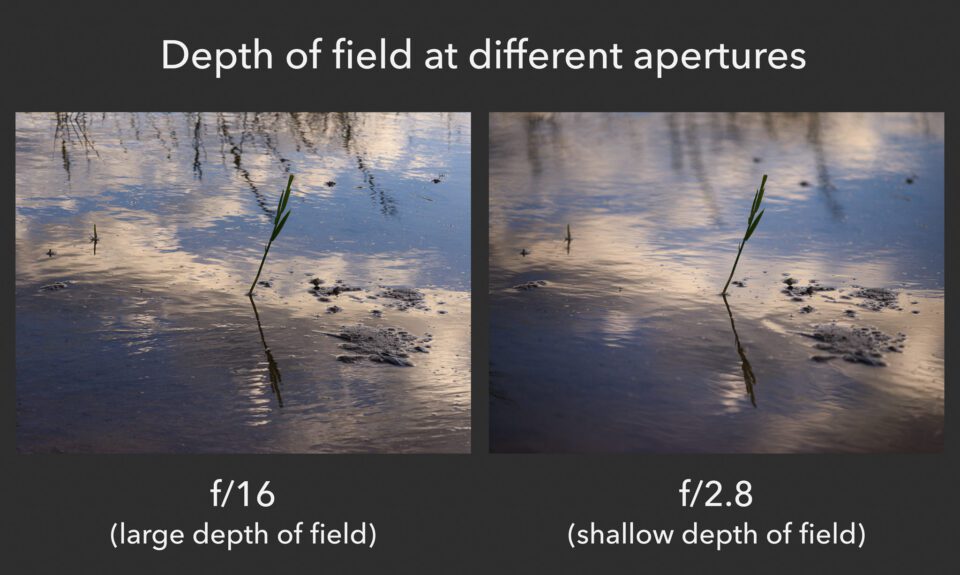
As yous can see, that is a meaning difference. The photograph on the left has a larger depth of field, which means that more of the scene appears sharp from front to dorsum. However, the f/two.8 photograph on the right has a pleasant shallow focus upshot. In this case, information technology is arguably the better image. Y'all volition save yourself a lot of difficulties if you simply memorize this relationship.
In practise, the effects are quite clear. Equally your aperture gets smaller and smaller, your exposure will grow darker and darker, and your depth of field will increment. (Remember, too, that you can betrayal the photo back to normal past using a longer shutter speed.) The more photos you lot have, the less y'all will have to think about these effects. They will become second nature.
The Aperture Scale
The shutter speed scale is easy to remember. An exposure of 1/100 2d lets in twice equally much light every bit an exposure of ane/200 second, because it is twice as long. Unfortunately, aperture is non as intuitive. This is the scale it follows instead:
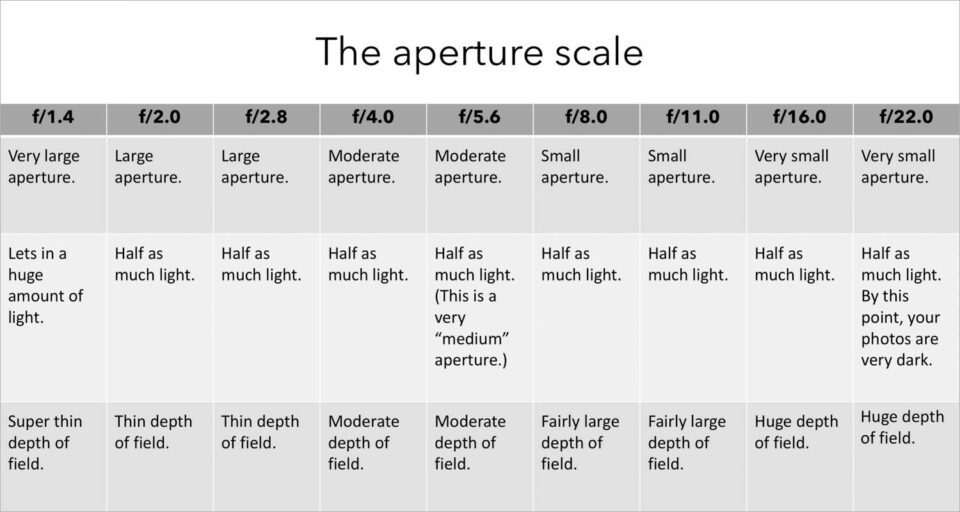
From f/1.4 to f/2.0 (or any other one-end bound) you volition capture half equally much light. You likewise will increase your depth of field. Also, go along in mind that you might be able to set values beyond this chart, like f/32, equally well as apertures between these stops, like f/six.3, depending upon your lens.
Typically, the sharpest apertures will be somewhere in the centre of the range. On most lenses, f/four, f/5.6, and f/8 are three of the sharpest apertures. Nonetheless, this varies from lens to lens. In add-on, sharpness should not be your master concern. It is ameliorate to have a photo with the proper depth of field, even if it means that some low-level pixels have a bit less detail.
If you want to learn more about this topic, accept a look at Photography Life's detailed articles most aperture and f-stop. Forth with that, we take some other article that explains every single effect of aperture, although it is a fleck avant-garde, and it assumes yous take a decent foundation already.
ISO – Not Part of Exposure
ISO is an interesting one. It brightens your photos, merely information technology is not role of your "luminous exposure," since it does not impact theamount of light that reaches your photographic camera sensor (the definition of exposure). Instead, information technology merely brightens a photo in-camera after your sensor has already been exposed to the light.
It is useful to raise your ISO when you lot have no other way to brighten your photograph – for example, when using a longer shutter speed will add also much motion blur, and you are already at your widest aperture. It is a very valuable setting to have, but information technology is not all good news. When y'all heighten your ISO, your photos will exist brighter, only you'll also emphasize grain (otherwise known as noise) and discolored pixels in the images along the style.
Accept a look at the comparison below:
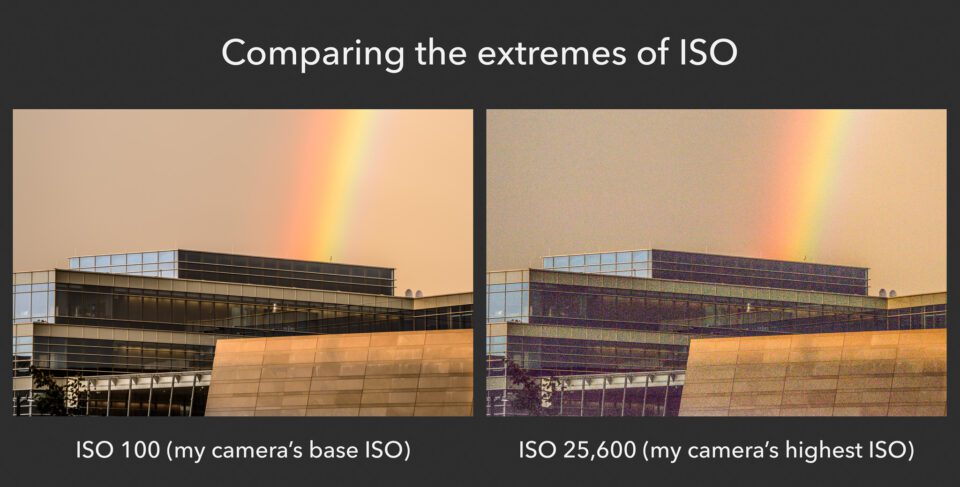
Hither, the photo on the right looks fashion noisier, and it has some foreign colour shifts in the shadows. That is considering it was taken at ISO 25,600, which is an extremely high ISO (more than what about photographers will ever set for normal conditions).
Still, a higher ISO will exist necessary when your exposure is too dim and yous take no other style to capture a bright enough photo. In cases like that, raising your ISO is a very valuable technique to empathise.
The ISO scale is easy to remember. At higher numbers, your photos will exist brighter, but you also volition run into more than and more than noise. The main stops on the ISO calibration are 100, 200, 400, 800, 1600, 3200, and 6400. Some cameras go across this range, in either direction, such as the ISO 25,600 prototype in a higher place. Also, you can set intermediate ISO values at 1/3 or 1/2 stops, such equally ISO 640 or ISO 1250.
The lowest ISO on your camera is chosen the "base ISO." Typically, the base ISO will be 100, but some cameras have ISO 64, ISO 200, or something else instead. This is the everyman native ISO on your photographic camera. If you fix your base ISO and expose your photo properly, you lot volition end upwardly with the all-time possible prototype quality and the everyman corporeality of visible racket.
Note:
Sure cameras accept extreme "LO" values for ISO, like ISO 32 or ISO fifty. Avoid using those settings, since they are fake and can lower your prototype quality. The aforementioned is true for simulated "How-do-you-do" ISO settings. They offer no benefit over simply brightening the photo in post-processing, and they even can harm your photograph's dynamic range (shadow and highlight item).
Take a look at the series of images below. Here, the photo on the left is at base ISO 100, and it is far too dark. By increasing the ISO, y'all volition come across the results continue to ameliorate. Although there is some noise at ISO 1600 if you zoom into the pixels, a noisy photograph is better than a picture that is too nighttime to utilise.
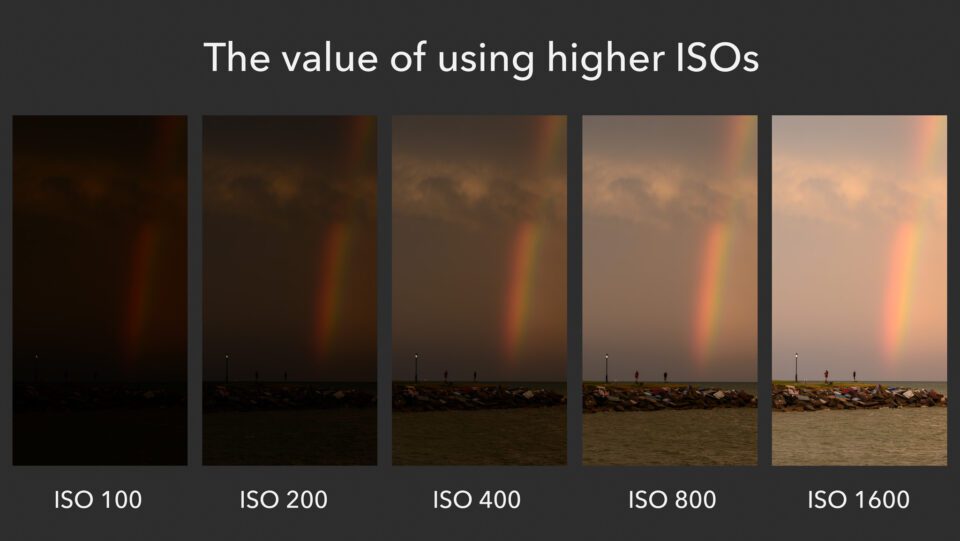
You lot might exist wondering how much noise exists in the ISO 1600 photo above, and the answer is that the overall amount is quite acceptable. Here is a ingather from the ISO 1600 photo higher up:
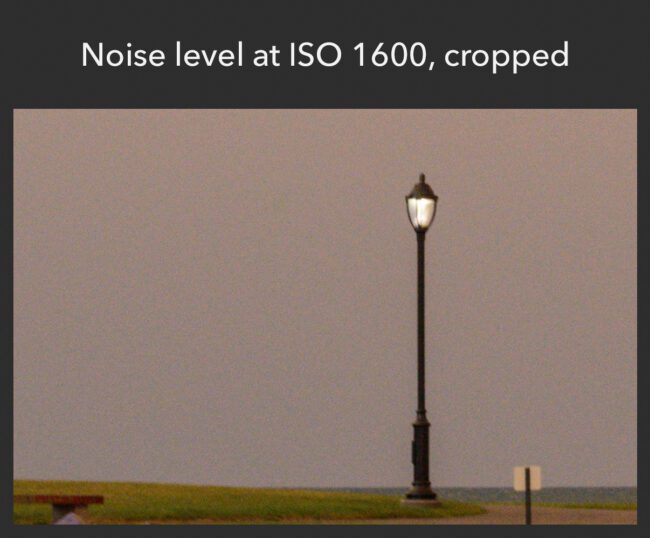
That is quite manageable. At least on this photographic camera – and they do differ – using ISO 1600 should exist perfectly fine, especially considering it is possible to reduce noise to a caste in mail service-product. However, it however is best to use your base of operations ISO whenever possible, capturing your photo with a brighter exposure (shutter speed and aperture) instead.
Unfortunately, y'all have to let in a lot of light in order to capture a well-exposed photo at ISO 100. That is fine in bright weather, or if yous are photographing a nonmoving scene from a tripod (since tripods allow you use longer shutter speeds). Simply information technology volition not always work. That's why ISO adjustments are so powerful, and why they have such an important outcome on your exposure even if they technically are non part of it.
And so, don't be hesitant to use higher ISO values if the scene requires it. With sports or wildlife, for instance, you will take pictures at higher ISOs very oftentimes. Although that isn't ideal, it is better than missing the photo because you're shooting everything at ISO 100.
ISO is highly technical at the sensor level, but that isn't important to know when you're starting out. Instead, but employ it like you lot would expect. Keep your ISO at the base value whenever possible. Just, if your exposure (shutter speed and aperture) will not consequence in a bright enough photo, it is time to raise the ISO. If you follow those suggestions, your photos and image quality will be as good as possible.
A Recommendation for Most Exposures
There are no universal tips for ever setting the perfect exposure. Still, many beginners have no clue where to start. If that is true in your example, yous will want more than just general communication well-nigh shutter speed, discontinuity, and ISO; you desire specific starting points that help you put all this knowledge into practice more easily.
For that reason, you lot volition find our recommended settings below for dissimilar genres of photography. Although these are very general suggestions, they should give you a expert idea of where to brainstorm if you but want a few bones tips for capturing a good exposure:
Typical Landscape Photography (Not at Nighttime)
- Use a tripod. Yous tin can read more than hither on how to use tripods and which 1 to get.
- Switch to discontinuity-priority mode, where the camera automatically sets the shutter speed, and you manually select the aperture.
- Shoot at f/viii in general, simply employ f/11 or f/16 instead if y'all need more depth of field (such as with a nearby foreground, or if you lot're using a telephoto lens). This is on a full-frame photographic camera. Use your photographic camera's equivalent aperture past dividing these numbers by your crop factor.
- Set the ISO to its base value.
- Permit your shutter speed autumn wherever it needs to be for the proper exposure.
- Watch your highlights. Don't overexpose whatsoever of them. If necessary, employ negative exposure compensation to darken the photograph. Why? It is just easier to brighten shadows in post-processing than to darken overexposed highlights.

Portrait Photography (No Wink)
- Shoot handheld, use a tripod, or use a monopod. In this example, the best pick is not set in stone. Use any method you lot are most comfortable with, or option a setup that works all-time for your particular photoshoot.
- Use aperture-priority mode.
- Cull an aperture that gives you a pleasing depth of field – typically, something like f/2.eight or f/ane.4, only it depends upon the look you want.
- Watch your shutter speed. If you start to discover move blur, your shutter speed is too long, and you need something quicker.
- Go on your ISO low, but don't be afraid to enhance information technology if your aperture and shutter speed are non letting in enough low-cal. In darker environments, especially, you likely will need to raise your ISO then that you can employ a fast plenty shutter speed.
- Once once more, don't overexpose any highlights. Employ negative exposure compensation if necessary.
The shutter speed in this photograph is so fast merely because it was a bright day, and, at f/1.8, the photo would have been overexposed without a fast shutter speed to darken the image.
Sports and Wildlife Photography
- Shoot handheld or utilise a monopod.
- Use aperture-priority way. (Some guides will suggest that you use shutter-priority fashion, which is good if you lot are trying to learn things about motion mistiness, but information technology oft throws your aperture to strange values and more often than not should exist avoided once you become more than advanced.)
- Use a big discontinuity, such as f/ii.8 or f/four.
- Sentry your shutter speed very carefully. You volition need something fast (similar i/500 or 1/1000 second) to freeze fast-moving sports.
- Nigh likely, you will want to raise your ISO to a value that lets you use such a fast shutter speed. It'southward worth the tradeoff. Racket is better than motion blur.
- Do not overexpose any highlights.
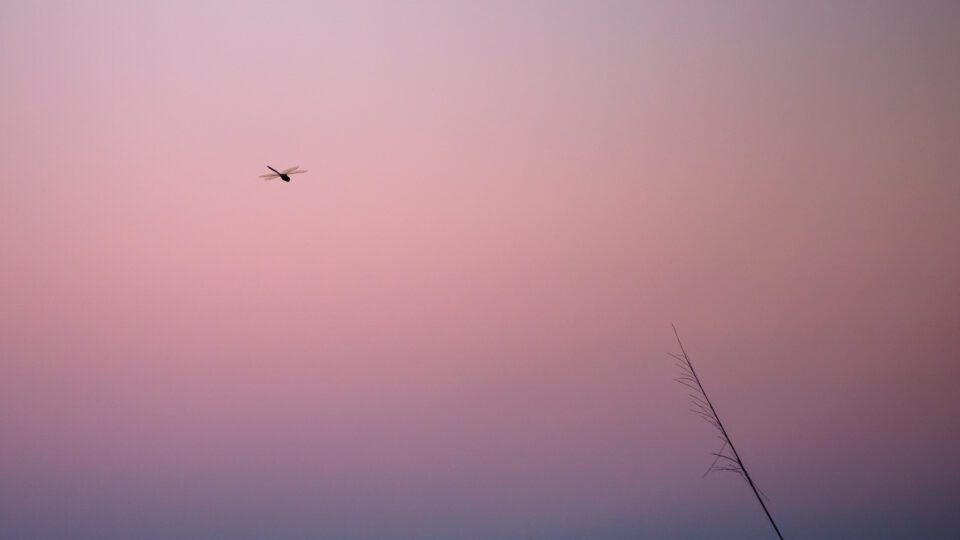
This photograph required a loftier ISO of 1400 in order to utilize a fast shutter speed, just it was worth the tradeoff. Although at that place is some extra noise in this image, even the dragonfly's winds are very abrupt.
Recommended Exposure Settings Roundup
These suggested settings are non universally accurate, but they should be useful for a beginner who wants a starting indicate for getting the proper exposure. At whatever rate, they certainly work improve than switching to transmission way and attempting to option the right settings before you lot know what anything does. (Though, that is however a good style to acquire, if y'all aren't taking critical photos.)
An important signal here is that you will outgrow these suggestions organically equally you become more and more skilled at exposure in photography. The list above does not cover some rarer scenarios (such equally using a large aperture for Milky Way photos), simply you will realize them pretty quickly in the field. Eventually, you should add your own points to each of these lists and expand on new exposure techniques over time.
Conclusion
Exposure can seem complicated, simply information technology is one of the most important technical topics to know if you want to take high quality photos. The all-time thing you lot tin can do at present is go out and test the suggestions above for yourself. Play around with your exposure settings, likewise as ISO. Pay attention to how they affect a photo. Most of all, go along practicing. Exposure is something you volition never finish improving, and, without a dubiety, it is worth the effort to larn.
If you desire further reading on this of import topic, accept a expect at our "photography nuts" articles below that get into more detail nearly exposure and related topics:
- Discontinuity in Photography
- Shutter Speed in Photography
- ISO in Photography
Source: https://photographylife.com/what-is-exposure
0 Response to "the brightness level of a photograph is referred to as the what ?"
Post a Comment